In this article, I will be sharing 6 convenient tips to help ease your Showit experience.
So let’s get started with handy tip number 1!
1. Add your colour pallet, fonts and typestyle into design settings
As you may know, our website templates are all fully customisable, so you can add your colour pallet and fonts to align your website with your branding and business perfectly.
Setting up your colour and fonts is the perfect first step in customising your template.
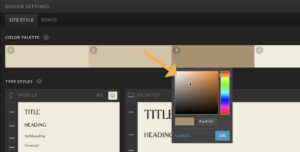
COLOUR PALLET
To add your colour pallet click on Design Settings in the Site tab at the top of the left panel. Once you are in the design settings, there are two tabs, Site style and Fonts. In the Site style tab, you can now assign 8 colours. To change a colour, click on the coloured rectangle that you wish to change. You can then either add in a specific hex code or use the colour picker.
Adding your colours in here will create easy access to them later on. It will also update the corresponding colour in the original template design. Your colours will now be available in the Properties Panel as you are customising elements within your site.
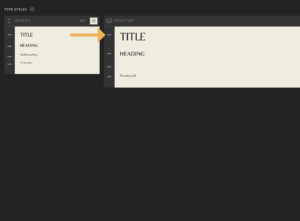
FONTS AND TYPESTYLE
To set your typestyle, you may first need to add your fonts to showit. If your font is a google font, you can select it at the top of the Fonts tab in the Design Settings. Otherwise, upload a custom font file to your media library. Find your Media Library right under Design Settings in the Site tab. This font file will have to be a .woff file. To convert your font to a .woff file, you can use the free generator at Font Squirrel Here.
Once you have converted your font and uploaded it to your media library, you will add it as a Custom Font in the Fonts tab of Design Settings.
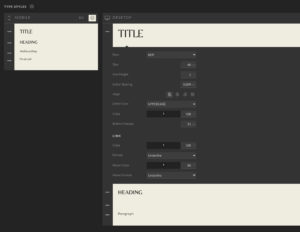
Now head back to the Site Style tab in Design Settings. And here, we will set your typestyle by clicking on the three white dots next to each option. Once clicked, a drop-down window will open, allowing you to select the Font, Size, Line Height, Letter Spacing, Alignment, Letter Case, Colour, etc.
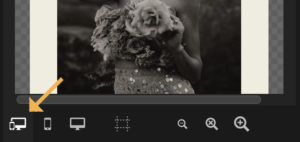
2. Design and Customise with mobile and desktop side by side
Designing and customising your website with both mobile and desktop views open will help with consistency between both versions. Of course, you can switch between each one to get a better look and larger viewing size, but regularly having both open will help the flow of the process.
You can switch between desktop, mobile and both by clicking on the icons at the bottom left of your window.
3. Copy and Paste Type and Shape Settings
We know a little Showit hack ‘Special Paste’, and it is a huge timesaver. ‘Special Paste’ is a keyboard shortcut that allows you to copy and paste a text colour, size and style to other text boxes. This will enable you to make quick changes to multiple text areas across a webpage.
BUT text isn’t the only settings you can copy and paste. ‘Special Paste’ can be used on shapes, icons and galleries. You can even paste between desktop and mobile layouts for the same item.
SPECIAL PASTE KEYBOARD COMMANDS:
- Copy like usual: Command-C (Control-C on PC)
- Then select the item or items you want to paste the settings onto.
- Special Paste using: Shift-Command-V (Shift-Control-V on PC).
‘SPECIAL PASTE’ CAN BE USED ON:
TEXT
To copy and paste: Text Style + Hover + Transitions + Effects
SHAPES:
To copy and paste: Shape Style + Hover + Transitions + Effects
ICONS:
To Copy and paste: Icon Color + Hover + Transitions + Effects
GALLERY:
To copy and paste: Gallery settings + Hover + Transitions + Effects
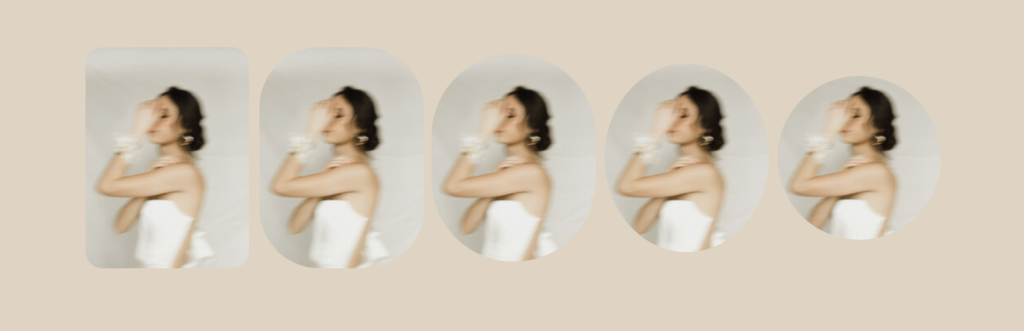
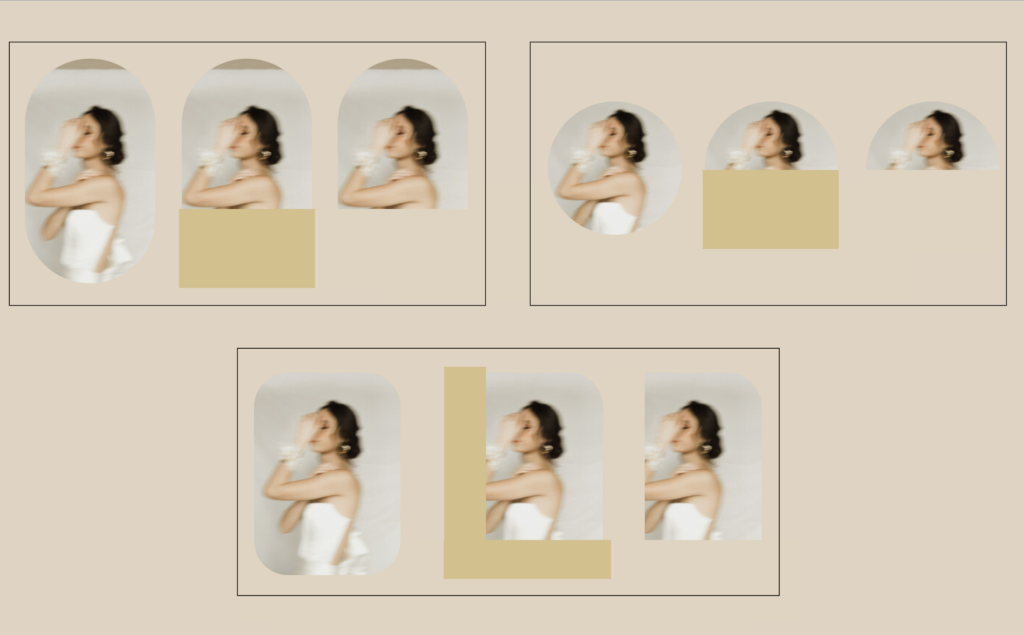
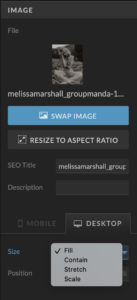
4. Making your images into different shapes
To add design interest to your website you might like to turn some of your images into different shapes.
This can be done in the effects tab in the right panel.
You can select and change the different rounded corner options and setting to get a variety of outcomes.
If you would like to create other shapes like an arch or half circle you can do this by using the rectangle tool.
The rectangle tool is located at the bottom middle of your window.
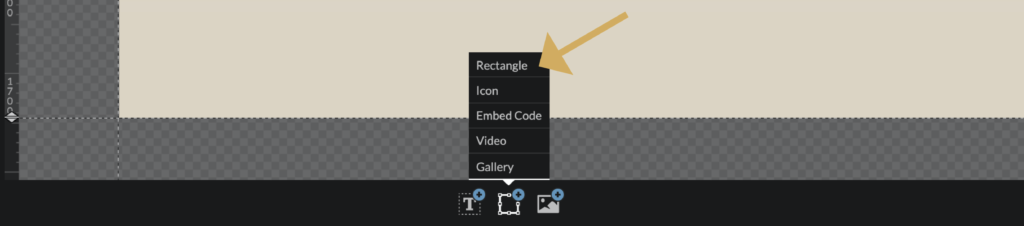
Using the rectangle tool make a box to hidden a section of the image to create your desired shape.
Make the box the same colour as your background and voila you will have your shape.
Feel free to play around with this technique to create a selection of other unique shapes.
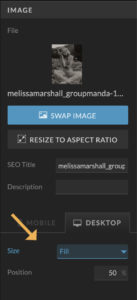
5. Cropping Images
In Showit, you can crop images by using Showit’s image ‘Size’ and ‘Position’ settings. Under Size, choose the option ‘Scale’. In this setting, you can move your image horizontally or vertically once you have set the scale setting above 100%
You will find these settings by selecting the Image or Video and clicking Image in the right panel. You will have to change the settings on both desktop and mobile.
AUTHOR:
Leelou Leniart

This article was written by me Leelou. I have gained my knowledge of the wedding industry first hand through photographing weddings for over 8 years. With a Bachelor in Communication Design, I now use my photography experience to create brands, websites and digital resources for wedding photographers and videographers.
SHARE:
Leave a Comment